Removing Mains Hum
What is Mains Hum?
Electrical mains hum is a common cause of annoying background noise. Mains supply in North America is alternating current at 60 Hz; in Europe it's 50 Hz. If the mains induces interference in your recorded signal, then it's at mains frequency and sometimes at the first harmonic of 100 or 120 Hz depending whether you are in Europe or America.
The good news is that 50 or 60Hz are below the normal frequency of the voice, so you can generally remove mains hum without affecting the voice at all. To do this, you need to use a plug-in effect.
Identifying the Frequency of your Hum
1. Select about one second of "silence" (hah!) in your recording.
2. Click Analyze | Plot Spectrum
Algorithm: Spectrum
Function: Hamming window
Size: 4096
Axis: Log Frequency
What you see is an image of the frequencies of your background noise.
Look at any tall peaks or spikes. Move your cursor to the centre of the peak and look at the text under the window. If it says Cursor: 49 to 50 Hz (in Europe) or 59 to 60 Hz (in North America), what you have is mains hum. (Note: Your tall peak could be at 100 Hz or at 120 Hz if you have one of the harmonic mains hums happening, or at another frequency or frequencies if a constant noise is being caused by something else like a computer fan.)
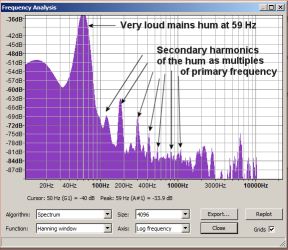
Here is an example showing US electrical mains hum at 59/60Hz and multiple secondary harmonics. It shows how important it is to eliminate mains hum before recording if at all possible (by switching off other electrical appliances), as the harmonic frequencies are so difficult to remove without affecting the voice.

How to install Single Band Parametric in Audacity
I use the effect "Single Band Parametric" in the Effect menu. You probably don't have this plug-in. It is not installed with the main install for Audacity. This step only has to be done once, and then the plug-in will always be available in the Effect Menu.
There are many plug-in effects available from links on the Audacity site, but for ease of use, I have uploaded the two little files that you need here.
Always virus scan anything you download from the Internet - even from me. :) You cannot be too careful.
Now copy the two files into the Plug-ins folder in Audacity. This is probably at C:\Program Files\Audacity\Plug-Ins. The vst-bridge.dll is just there to enable single_para_1203.dll to work.
Now open Audacity, and open one of your recordings. Click Effect. You have a list of effects, starting with Amplify. At the bottom of the list, you should see Single Band Parametric, which is the effect (plug-in) you have just installed.
NB If you cannot see Single Band Parametric in your list of Effects, you may need to ask Audacity to rescan its information to find it. To do this, click Edit | Preferences | Effects and tick the box that says "Rescan VST effects the next time Audacity is started". Then close and re-open Audacity, and it should now be there.
Using the Single Band Parametric effect to Remove the Hum
A. Ctrl+A to select the whole file. Click Effect | Single Band Parametric. Settings:
- Gain: somewhere between minus 20-70 dB - the level you need will depend on the strength of the hum.
- Frequency: the frequency you identified in the last step.
- Bandwidth: 0.1. The idea is to take out that hum and nothing else.
B. If you look at the Spectrum window again (as in Step 3), you will see that there is a deep notch where that peak was before. If there is still a hum, you may possibly see a secondary peak at a harmonic. If so, do Step A again, but this time using the new frequency.
Alternative Method using Notch Filter
If you prefer, you can use the plug-in already installed in Audacity. You will find Notch Filter in the Effect menu.
A. Identify the frequency in the same way (See Step 2).
B. Ctrl+A to select the whole file. Click Effect | Notch Filter. Settings:
- Frequency: the frequency you identified in Step 2.
- Q value: it is important to select a suitable value for Q. The lower the number, the wider will be the notch i.e. the more frequencies removed.
If you have a fairly broad peak at a low frequency (below 100 Hz), then a Q value of 1 is fine.
If you have a very thin higher frequency spike that looks just like a pencil line, a Q value of 20 will take out just that single frequency, thus minimising any effect on your voice.
If the spike is a little wider than that, experiment with Q values around 10 to see what gives the best effect at removing the noise without affecting your voice.
Removing any Residual Noise
Both these methods should be successful. If there is any hissy white noise left, a light pass of Effect | Noise Removal or Effect | Noise Reduction (depending on your Audacity version) will do the trick. See this page in the Wiki for full instructions.
Using These Effects to Reduce Sibilance
I have also found Single Band Parametric excellent for reducing the sharp sibilant 's' sound to which some of us are prone. Zoom right in and select the 's' sound only. Analyze | Plot Spectrum as in Step 2. You should see a tall thin spike somewhere above 3000 Hz. Make a note of the precise frequency, then follow the steps for Single Band Parametric or Notch Filter above, but with the 's' sound ONLY selected in the wave form.