Beginner's Guide to Cutting Audio
- Related topics: How To Listen With Your CD Player (burning files onto CDs)
Sometimes users want to cut (shorten) the files to make them fit on a CD, or they'd like to strip out the LibriVox disclaimer from the beginning of the files. This guide explains how to do this in Audacity. Audacity is a free, open-source program and it's cross-platform (Windows, Mac, Linux).
However, if what you want to do is split a bunch of files, from one or more LibriVox audio books, into shorter pieces and all in one semi-automated operation, see the how-to guide for Mp3Splt.
Step 1: Install Audacity and LAME
See this page on how it's done.
Step 2: Import the LibriVox mp3 file into Audacity
Open Audacity. From the main menu, select File > Open and choose the file you wish to cut.
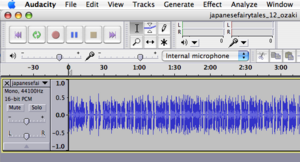
When the file opens, you should see something like this:
Step 3: View the file properly
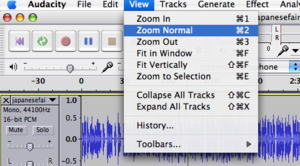
The view above is condensed. To view the 'regular' waves, choose View from the main menu, then click on Zoom Normal.
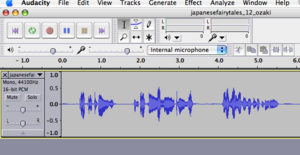
You'll end up with something like this:
Step 4 - Highlighting the audio to be cut
Listen to the audio by clicking the Play button underneath the menu. You will see a cursor (a vertical line) moving through the audio waves as they play back. From this, you can determine the beginning and end of audio you wish to cut. Click the 'Stop' button to stop the playback.
Now you need to highlight the audio waves you want to cut (the process is similar to working with a text file - you highlight a word that you wish to delete). There are two methods to do this:
- For shorter pieces: place your cursor at the beginning of the waves you wish to cut (to place the cursor, simply click there).
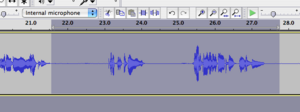
- Windows users: left-click your mouse, keep holding the left button down and drag the cursor to the end of the waves you wish to cut. Release the mouse. You should see the waves highlighted as in the image below.
- Mac users: same process with the one-button mouse or equivalent (trackpad etc).
- For longer pieces: place your curser at the beginning of the waves you wish to cut. Then use the scroll bar at the bottom of the Audacity window to move to the place you at the end of the waves you want to cut. Shift-click (hold the 'Shift' button down and left-click your mouse). This should select the waves to be cut, and you should see them highlighted as below.
Step 5: Cutting the audio
Now cut the highlighted wave forms by choosing Cut from the Edit menu (you can also click the little button with the scissors):
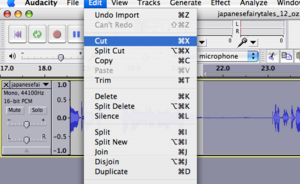
Step 6: Export the new file
Repeat steps 4. and 5. above until you have cut everything you wish to cut.
Now you need to export the new file with the changes you've made. Audacity saves in its own format, but usually you'll want to create another compressed file - .mp3 format is compressed and will take up a lot less space on your CD or wherever you wish to keep it.
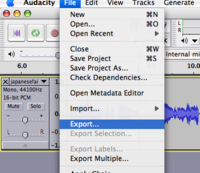
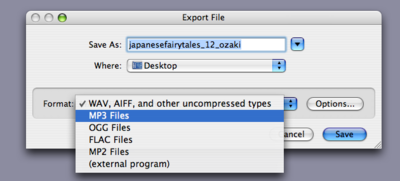
From the main menu, choose File > Export. In the Format box, choose .mp3 (see the two images below):
When you have selected mp3, click on the Options box next to it. A window "Specify MP3 Options" like on the image below will appear. Leave all other settings, but click on the little arrow to bring up the pull-down menu in the Quality field.
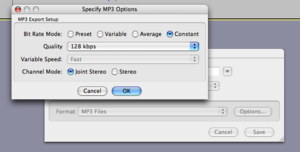
For voice recordings, you can go as low as 48kbps - or if you prefer a slightly better quality, choose 64kbps. The lower the number, the smaller the resulting file, and the less space it will take up on your hard drive/player/CD.
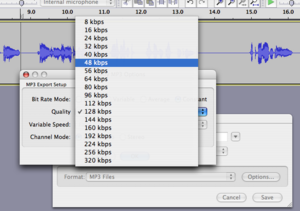
When you've selected the quality, click OK to close the "Specify MP3 Options" window. You are now ready to export your new file. You may wish to change the filename slightly to avoid confusion, for example by appending ED to it (in my example above, I'd change the filename to "japanesefairytales_12_ozakiED"). Click 'Save' in the "Export File" window. Your new file should be in the destination you specified (usually the same place where the original file that you imported is located).
If you have any problems with this, feel free to post a message in the "Need Help" part of the LibriVox forum. You'll have a couple of replies soon after you posted.
For more information, see also the LibriVox wiki page Deleting Errors in Audacity.
Total Recorder, an Alternative for Cropping and Splitting Files
One LibriVox volunteer has used the program Total Recorder for years. While this program's primary purpose is to record audio on your PC (running MS Windows), it can also be used quite satisfactorily to crop the ends off audio files or to split them into pieces, such as when there is more than one chapter in a single file, when you need to listen in order to determine where to crop or split.
In the volunteer's opinion, Total Recorder is simpler to use for this cutting than is Audacity, having done it to hundreds of files. On the other hand, one big advantage in using Audacity is that so many folks who read for LibriVox use Audacity as their recording software, so there are lots of people who can -- and are willing to -- answer your request for help at the LibriVox help forum as mentioned.
Even though Total Recorder is a commercial program, you can download a free trial version from the creator's Web site. See Software We Use for details. The only significant limitation of the trial version is related to recording, so that won't affect your use of it for editing.
When you install Total Recorder, you have the choice of whether or not to install its own sound driver. Choose not to install Total Recorder's driver, since it is needed only for recording. However, if you want to try recording with this program, then do install the driver.