How To Make M4B Files: Difference between revisions
| (31 intermediate revisions by 6 users not shown) | |||
| Line 1: | Line 1: | ||
==What |
==What is M4B?== |
||
The file extension .M4B defines the file as specific type of audiobook in the same way .MP3 defines a specific type of audio file. An M4B audiobook is very similar to an audio album made of .MP3 files. In fact they rely on the same [http://wiki.librivox.org/index.php/What_is_ID3 ID3 tags] to identify: Artist (Author), Album title (Book Title), ALbum Image (Book Cover), Track (Chapter), Track Length (Chapter length). The biggest difference is that the M4B will bookmark or remember your place in a file when you stop. The Librivox M4B collection is available from the catalog pages. |
|||
An M4B file is an audio file which can be bookmarked. This is the audio-book file type. These files can have chapter markers which can be skipped through as you would skip through files on a play list. They can have built in cover art and chapter images. They will remember where you left off each time you stop the file and come back to it . And variable speed settings on Ipods and a growing number of other mp3 players can be utilized by this file type. The ability to bookmark allows for as little as one large file instead of many small ones without the burden of fast forwarding to find your spot every time you resume listening or the fear of otherwise losing your place. The reduced number of files also makes browsing through your files to find your book and your place in it much less effort. |
|||
Librivox Forum thread for [https://forum.librivox.org/viewtopic.php?f=22&t=28784 Audiobook M4B] discussion |
|||
==How to Make M4B Files== |
==How to Make M4B Files== |
||
The basic steps as well as two audiobook building programs "Chapter & Verse" for PC users and "Audiobookbuilder" for MAC users are described on this page. |
|||
There are a few different programs which can do this. The easiest to use and best is [http://lodensoftware.com/chapter-and-verse/ Chapter and Verse] (you will also need [http://www.apple.com/itunes/download/ Itunes]). |
|||
Things you will need: |
|||
* the audio files (Usually that means downloading them, unless you were the reader, PL, or BC and already have them on your computer) |
|||
Download the LibriVox mp3 files to start out with (the zip file of the whole book is a time saver). You can converter your files with different settings to get a smaller M4B file or a larger file with better sound quality, or you can make two versions for people with different preferences if you want to. If you are using [http://lodensoftware.com/chapter-and-verse/ Chapter and Verse] after you drop your mp3 files for the M4B into the program window, or otherwise select them, you will be asked about converting the files. Click the "Update Settings" button and set the program to convert the files to your liking. The settings shown below are the ones I use for good sound quality. If I want to make a smaller file I simply change the bit rate to 32 kbps. |
|||
* an image for the audiobook cover |
|||
* software to combine the audio files and the image into an audiobook |
|||
Things you may need: |
|||
[[image:M4B-convert.jpg|thumb|center|Audiobook conversion settings]] |
|||
* software to make adjustments to audio files |
|||
* software to edit image file |
|||
==Downloading Files== |
|||
You can download the individual mp3 files or the "Zip file of the entire book" from either the Libirvox Catalog project page or corresponding Internet Archive page. The zip file will save you quite a few mouse clicks; you will have to unzip the files after the download completes. Although the 128kb mp3 files provide a little better, most audiobooks use a 64kpbs [http://wiki.librivox.org/index.php/Glossary#Bit_Rate bit rate] (or less) so you don't need to take the extra time downloading the larger 128kb files. |
|||
Because you will end up with one large file (or just a few depending on how long the total run time of your book is and if you need to break it into parts or not) certain things will become redundant and unnecessary. Such things as introductions at the beginning of every chapter beyond the first (of course reader's names should be kept if given) or announcements of the end of a chapter which would then be followed directly by an announcement of the beginning of a new chapter can be removed with an editor such as [http://audacity.sourceforge.net/ Audacity] if you so choose. But this step isn't necessary and can be skipped unless you feel like doing it. |
|||
When adding chapter images, if you choose to, you may encounter errors with M4B files that contain chapter images larger than 300 pixels in either direction. To avoid this or if your file does not play after you build it you can resize the images in an editor (such as [http://www.gimp.org/ Gimp]) or the online editor built into [http://photobucket.com/ Photobucket]. Cover images appear to have no such problem as [http://lodensoftware.com/chapter-and-verse/ Chapter and Verse] automatically resizes the cover image used. |
|||
==Adjustments to Audio Files== |
|||
You may want to edit the audio files that you downloaded. Listening to a sample and/or looking at the file properties can help you decide if adjustments are necessary. Here are the links to the wiki information on two programs you can use to edit the audio files [http://wiki.librivox.org/index.php/Audacity_1-2-3 Audacity] and [http://wiki.librivox.org/index.php/GarageBand GarageBand]. Here are a few things to consider. |
|||
An editor (such as [http://www.gimp.org/ Gimp]) or the online editor built into [http://photobucket.com/ Photobucket] may be used to make cover images (of course be sure the image you work with is in the public domain, [http://commons.wikimedia.org commons.wikimedia.org] is a good source). If you have little experience editing images this can be as simple as cropping an appropriate image into a square or near square and adding the title of the book and the author's name somewhere over the top. Often a book will have CD cover art created for it; this works perfectly for an audio book file cover. |
|||
Volume or background noise - If the volume is too low or there is too much background noise the audiobook may be difficult to hear. |
|||
Librivox Disclaimers & readers - You are not required to remove any of these. The first disclaimer in the audiobook should always be kept. The first time a reader states their name should always be kept. If the project is so big that you need to split in into multiple files, keep at least the first disclaimer and announcement of each reader in each file. |
|||
Listeners may appreciate you removing the disclaimer if there are a lot of short chapters, removing the readers name if it a solo project, removing repeated announcements at the end of the chapter, or trimming off long silences are the end of each file. |
|||
To do this with [http://photobucket.com/ Photobucket] simply click on the "Upload Images & Videos" link, select "web URL," enter your file's address and hit the "Upload" button. |
|||
Chapters - In some cases, the audio file will contain multiple short chapters - consider splitting the audio file to match the chapters. In other cases, a large chapter may have been split into multiple audio files - consider combining the audio files to match the chapter. |
|||
[[image:M4BimgUL.jpg|thumb|center|Uploading your image to Photobucket to edit it]] |
|||
==Building the Audiobook== |
|||
If you plan to use either "Chapter & Verse" or "Audiobookbuilder" see the separate |
|||
sections describing them. The steps are a basic guideline. |
|||
a) convert .mp3 files - the M4B audiobook uses .m4a files for the chapters (.m4a is a specific type of .aac file) so you have to convert the files. |
|||
That done and the files saved you can then click the "edit" link above the thumbnail of your image to begin making changes. On the tool bar of the editor is a "Crop" button and a "Resize" button. After you have reshaped and/or resized you can play around with the other feature as much as you want, add some text (under the "Decorate" tab on the tool bar), save the file and download a copy to use for your M4B file. In [http://lodensoftware.com/chapter-and-verse/ Chapter and Verse], once you have added and converted all of the mp3 files, you will click on the "Metadata" tab to enter the appropriate file information and add your image as the cover art for the file. |
|||
<center><gallery> |
|||
image:M4Bcrop.jpg|Cropping in Photobucket. |
|||
image:M4BimgEdit.jpg|Adding the books title and authors name |
|||
image:M4BaddImg.jpg|Embedding your finished image in your M4B file. |
|||
</gallery> |
|||
</center> |
|||
b) select or create album artwork - If you want to use the image from the Librivox Catalog page, right-click on the "Album Art" link and save the image to your computer; this is the easiest way to select an image. As an alternative, you can make your own image if you want or if there is not one available on the catalog page. In general, images should be square, not larger than 300x300 pixels in size, and saved as either a .jpg or .png file. For an audiobook only one image is required; making a CD Cover is a bit more involved. There is more information on creating artwork and the related software in the [https://forum.librivox.org/viewtopic.php?f=22&t=28785&sid=4c6d5bb5ff2ba230ffff0ac1e29a2c36 Volunteer CD Covers! forum thread] and on the [http://wiki.librivox.org/index.php/CD_Covers CD Covers Wiki page]. |
|||
If you can't find a picture you like for your book's cover art or would just prefer to you can use this template I've made: |
|||
[[image: |
If you can't find a picture you like for your book's cover art you can use this template: [[image:Template.jpg|300px|thumb|center|Just save this image to your computer and in an image editor add the book's title and author.]] |
||
c) Audiobook file size - Listeners have reported problems with downloading or playing audiobooks that are "too big". Consider splitting files longer than 220mb (8 hours at 64kb) into smaller sections as a rough guideline. You could use a 32kb setting to get a file about half that size for the same time duration. |
|||
Or you can download a .psd of the same image with text already on it and just replace what I have written with the appropriate information in an image editor such as Photoshop or [http://www.gimp.org/ Gimp]): [http://www.archive.org/download/LibrivoxM4bCollectionAudiobooks2/M4BCoverTemplate.psd M4BCoverTemplate.psd] |
|||
==Sharing your work== |
|||
If you are interested in, or have created, an audiobook please let it be known [http://forum.librivox.org/viewtopic.php?f=22&t=28784 here]. Just post a message containing a link to the LibriVox catalog page for that particular book and a link to your file and link to the picture file you used as a cover would be nice too. You can upload the M4B file somewhere such as [http://www.mediafire.com/ MediaFire.com] or at [http://www.archive.org Archive.org] as a test file. Here is a small template for that post. |
|||
The only thing left to do is renaming the chapters. There are some options with this; you might just set it to use the metadata title (which normally works great), set it to just say "Chapter" with a number next to the word or you might choose to manually type in each name if you want them named and the metadata title for the file does not successfully do this for you. Once done you need only hit "Build Audiobook," give the file a name and save it and you are done. It's as simple as that. |
|||
Librivox Catalog Page: |
|||
M4B file location: |
|||
[[image:M4BChapterName.jpg|thumb|center|Selecting how each chapter is to be named.]] |
|||
Image file location: |
|||
==Chapter & Verse for PC users== |
|||
You will need to download both [http://lodensoftware.com/chapter-and-verse/ Chapter and Verse] and [http://www.apple.com/itunes/download/ Itunes] - both are free. Chapter & Verse uses iTunes for file conversion and merging the files into an audiobook. |
|||
1) Open Chapter & Verse |
|||
[[image:CV_main.jpg|center|main window]] |
|||
This is the main "Chapter & Verse" window. As you build the audiobook you should work through the 3 main tabs (Input Files, Chapters, Metadata) from left to right. If this is your first time, you should take a few minutes with the settings before you start converting any audio files. To get to the Options/settings window select "Tools" then "options" or click on the little gear-shaped "Options" icon. |
|||
2) Options and Settings |
|||
These images show some suggested settings followed by a short explanation. Once you understand what the settings do, feel free to experiment and set them to meet your needs. |
|||
[[image:CV_prog.jpg|center|Program Settings]] |
|||
"Use Last Directory Accessed" is set to use the same directory this time that it used last time. You could specify a specific location if you want. |
|||
You can set the first three "Startup and Warnings" on or off. |
|||
Turn off the final one "Show Audiobook Duration Warning", unless you only want to make |
|||
very small audiobooks. The warning will pop up frequently if you make |
|||
medium or large audiobooks and can become annoying. |
|||
Default Sort files is set to "Ascending" so to get the files in named order: filechap1, filechap2, filechap3... |
|||
Fix Timescale Issues is set to "ask Before" to be able to look at the problem |
|||
before the program fixes it; this rarely comes up as an issue. |
|||
Add Audiobook to iTunes is set to "add Automatically" because to create have a copy of each audiobook. This setting does not effect the audiobook, it just takes a few seconds to make a copy in your iTunes library. |
|||
[[image:CV_conv.jpg|center|Conversion Settings]] |
|||
To keep things together, turn on "Place Converted Files.....". You can specify another location if you like. |
|||
The AAC encoder settings are both critical and confusing. The settings you see will make a 64kbps mono audiobook. Here is what first confused me, the 128kb setting - this is the Stereo rate - when you select Mono for channels you will only get half of that. Using a 64kbps Stereo bit rate and mono channels will give you a 32kbps audiobook. |
|||
[[image:CV_chap1.jpg|center|Chapter Settings]] |
|||
These settings control the information that automatically fills the "Chapters" tab in the main Chapter & Verse window. Use <Metadata Title" to pull the information for the chapter titles from the ID3 tags; the Interval is set to "Chapter" so if will pull the ID3 tag information with each new input file. The other settings for "Interval" and "Move" are set to very large values so that they should not activate. |
|||
Do not use chapter images so the settings are not important; if you use chapter images Chapter & Verse will create a movie or .M4A file instead of a .M4B file. |
|||
[[image:CV_meta1.jpg|center|Metadata Settings]] |
|||
These settings control the information that automatically fills the "Metadata" tab in the main Chapter & Verse window. |
|||
"Automatically Extract ...from First Input File" is set so that the Artist, Album, etc. will fill in with the ID3 tags from the first chapter. If you turn off the "auto-fill" option, you will have to fill all of fields in the Metadata tab yourself. With it set to "auto-fill" you should just have to edit the title. |
|||
"resize Artwork Automatically" and "300" pixels are set in case the artwork was larger than 300x300 pixels in size. |
|||
3) Open Windows Explorer and navigate to the folder that contains the audio files you downloaded |
|||
Select the audio files in Windows Explorer and drag them to "Chapter & Verse", please re-read information about audiobook size above. |
|||
An "Audio Encoding Error Summary" window will pop up unless you have already converted the audio files to AAC. For .MP3 files this is an error screen you want to see. If you want to check or change your options/setting there is a button for that, otherwise select "Yes - Convert" to use the settings you have already selected. |
|||
"Chapter & Verse" will now startup iTunes to help converting the .MP3 files. There is a status bar at the bottom of the "Chapter & Verse" window and at the top of the iTunes window to track your progress. When the conversion is done, you should have information in all 3 main tabs (Input Files, Chapters, and Metadata). |
|||
The Input tab should show your files have been converted to .M4A files (.M4A is a type of .AAC file). |
|||
The Chapters tab should show the start time and title for each chapter. If you see a red-colored "!", the chapter names are duplicates. These are the names that will appear in the chapter list of the final audiobook, click on them and edit as needed. |
|||
The title of the first chapter automatically fills in the Title field; you will want to edit this as: a) the tile of the first chapter is rarely the same as the title of the book, |
|||
and b) this will become the file name of the audiobook when it saves. Remove any punctuation and unnecessary words (A, An, The, of) in your file name. |
|||
Click "Select Artwork" and find the artwork you saved or created. |
|||
Check that the image of you art shows up in the upper-right and that your Title, Author, and Album are correct. |
|||
Then hit the "Build Audiobook" button and confirm/select your save directory. |
|||
When the audiobook build is done being you will have a M4B file ready to upload. |
|||
==Audiobookbuilder for MAC users== |
|||
You can buy a program called [http://www.apple.com/downloads/macosx/ipod_itunes/audiobookbuilder.html Audiobook Builder]. You can download a free trial version, the [https://store3.esellerate.net/store/checkout/CustomLayout.aspx?s=STR855169910&pc=&page=MultiCatalog.htm full version] costs about 5 US$. |
|||
This program is very easy to use. [http://www.splasm.com/audiobookbuilder/index.html A tutorial is available]. |
|||
In order to choose the folder to which your files will be saved, go to '''preferences'''. |
|||
2.1. Create a New Project. |
|||
2.2. Fill in Author and Title fields. |
|||
2.3. Drag a cover image to the indicated field.<br/> |
|||
[[Image:ABB3.jpg|Center|AAB3]] |
|||
2.4. Click on the "more" button if you want to enter additional data ("narrated by", "Copyright", "Year", "Comments", etc...)<br/> |
|||
[[Image:ABB4.jpg|Center|ABB4]] |
|||
2.5. Click the "chapters" tab, drag the chapters to the Audiobook Builder. If the chapters have special characters, click on "Show details" to correct the title names (the special characters tend to look weird, but just copying them from the catalog page usually works).<br/> |
|||
[[Image:AAB5.jpg|Center|AAB5]] |
|||
2.6. Once the chapters have been added (this can take some minutes), go to the "Finish" tab. |
|||
==How to Share Your M4B File With Us== |
|||
2.7. Check your settings in the "build options". Choose format: "M4B"; part style "Break Between Chapters". Set the target length to the desired duration so that you get a number of parts more or less equal in duration. '''Note: the total length for each file should not exceed 6 or 7 hours as some devices will have problems playing longer files.''' |
|||
'''If you are interested in converting LibriVox.org books into M4B audiobook format or have done so already please let it be known [http://librivox.org/forum/viewtopic.php?t=24651 here] when you have if you wish to share it'''. Just post a message containing a link to the LibriVox catalog page for that particular book and a link to your file with the file name as the title of the book (without words like "A" or "The" at the beginning) followed by the bit-rate of the file (as an example something like DivineComedy_32kb.m4b). A link to the picture file you used as a cover would be nice too. You can upload the M4B file for us somewhere such as [http://www.mediafire.com/ MediaFire.com] or at [http://www.archive.org Archive.org] as a test file. We will then add the file to our collection and make it available. |
|||
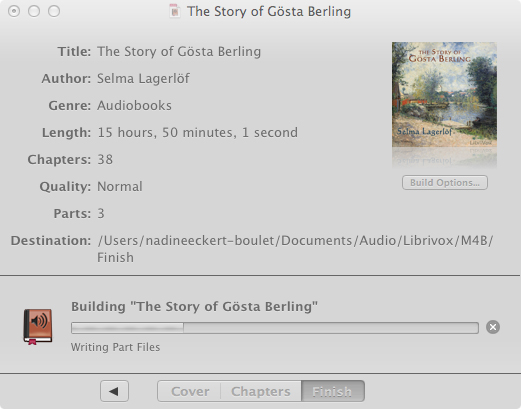
2.8. Click "Build Audiobook". <br/> |
|||
[[IMage:ABB1.jpg|Center|ABB1]] |
|||
2.9. Once your Audiobook is ready, a window pops up, saying: "Show in Finder" or "OK". Click "Show in Finder".<br/> |
|||
To share your completed M4B file(s) using Archive.org; create an account at [http://www.archive.org Archive.org], click on the "Upload" button in the top right hand corner of the web page and then the "share" button which appears in the same location, select your file, mark it as an audio file after it has been uploaded and you are asked if it belongs in the "other" category to which it is automatically assigned and mark it as public domain. Mark it as a test file unless you want to keep a page around to upload more files to later. After you have done the above and clicked "Share My File(s)" you will be given the address of your new page. Near the top of this page is an "Edit Item" link which you can use to make changes. |
|||
[[Image:ABB2.jpg|Center|ABB2]] |
|||
2.10. Rename your files (remove the numbers and articles at the beginning). |
|||
==More information== |
|||
2.11. You're ready to upload! |
|||
Existing LibriVox books converted into M4B files can be found [http://wiki.librivox.org/index.php/M4B_Catalog here]. |
|||
Latest revision as of 03:48, 9 January 2017
What is M4B?
The file extension .M4B defines the file as specific type of audiobook in the same way .MP3 defines a specific type of audio file. An M4B audiobook is very similar to an audio album made of .MP3 files. In fact they rely on the same ID3 tags to identify: Artist (Author), Album title (Book Title), ALbum Image (Book Cover), Track (Chapter), Track Length (Chapter length). The biggest difference is that the M4B will bookmark or remember your place in a file when you stop. The Librivox M4B collection is available from the catalog pages. Librivox Forum thread for Audiobook M4B discussion
How to Make M4B Files
The basic steps as well as two audiobook building programs "Chapter & Verse" for PC users and "Audiobookbuilder" for MAC users are described on this page.
Things you will need:
- the audio files (Usually that means downloading them, unless you were the reader, PL, or BC and already have them on your computer)
- an image for the audiobook cover
- software to combine the audio files and the image into an audiobook
Things you may need:
- software to make adjustments to audio files
- software to edit image file
Downloading Files
You can download the individual mp3 files or the "Zip file of the entire book" from either the Libirvox Catalog project page or corresponding Internet Archive page. The zip file will save you quite a few mouse clicks; you will have to unzip the files after the download completes. Although the 128kb mp3 files provide a little better, most audiobooks use a 64kpbs bit rate (or less) so you don't need to take the extra time downloading the larger 128kb files.
Adjustments to Audio Files
You may want to edit the audio files that you downloaded. Listening to a sample and/or looking at the file properties can help you decide if adjustments are necessary. Here are the links to the wiki information on two programs you can use to edit the audio files Audacity and GarageBand. Here are a few things to consider.
Volume or background noise - If the volume is too low or there is too much background noise the audiobook may be difficult to hear.
Librivox Disclaimers & readers - You are not required to remove any of these. The first disclaimer in the audiobook should always be kept. The first time a reader states their name should always be kept. If the project is so big that you need to split in into multiple files, keep at least the first disclaimer and announcement of each reader in each file.
Listeners may appreciate you removing the disclaimer if there are a lot of short chapters, removing the readers name if it a solo project, removing repeated announcements at the end of the chapter, or trimming off long silences are the end of each file.
Chapters - In some cases, the audio file will contain multiple short chapters - consider splitting the audio file to match the chapters. In other cases, a large chapter may have been split into multiple audio files - consider combining the audio files to match the chapter.
Building the Audiobook
If you plan to use either "Chapter & Verse" or "Audiobookbuilder" see the separate sections describing them. The steps are a basic guideline.
a) convert .mp3 files - the M4B audiobook uses .m4a files for the chapters (.m4a is a specific type of .aac file) so you have to convert the files.
b) select or create album artwork - If you want to use the image from the Librivox Catalog page, right-click on the "Album Art" link and save the image to your computer; this is the easiest way to select an image. As an alternative, you can make your own image if you want or if there is not one available on the catalog page. In general, images should be square, not larger than 300x300 pixels in size, and saved as either a .jpg or .png file. For an audiobook only one image is required; making a CD Cover is a bit more involved. There is more information on creating artwork and the related software in the Volunteer CD Covers! forum thread and on the CD Covers Wiki page.
If you can't find a picture you like for your book's cover art you can use this template:

c) Audiobook file size - Listeners have reported problems with downloading or playing audiobooks that are "too big". Consider splitting files longer than 220mb (8 hours at 64kb) into smaller sections as a rough guideline. You could use a 32kb setting to get a file about half that size for the same time duration.
Sharing your work
If you are interested in, or have created, an audiobook please let it be known here. Just post a message containing a link to the LibriVox catalog page for that particular book and a link to your file and link to the picture file you used as a cover would be nice too. You can upload the M4B file somewhere such as MediaFire.com or at Archive.org as a test file. Here is a small template for that post.
 Librivox Catalog Page:
 M4B file location:
 Image file location:
Chapter & Verse for PC users
You will need to download both Chapter and Verse and Itunes - both are free. Chapter & Verse uses iTunes for file conversion and merging the files into an audiobook.
1) Open Chapter & Verse
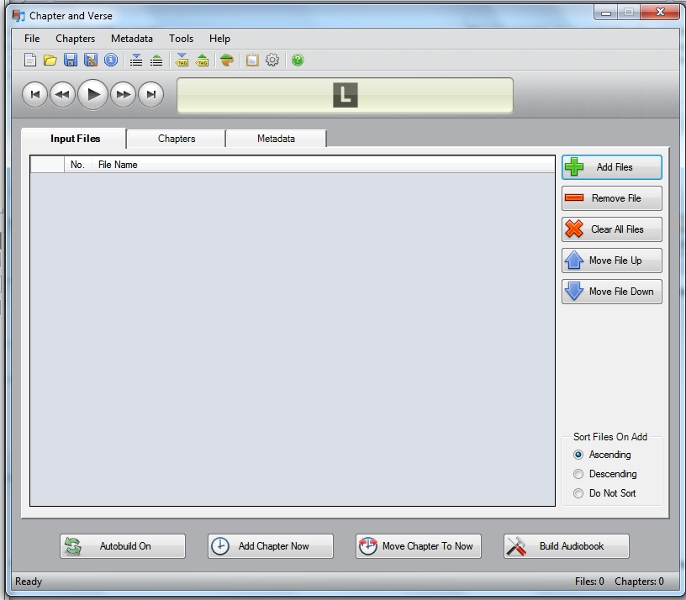
This is the main "Chapter & Verse" window. As you build the audiobook you should work through the 3 main tabs (Input Files, Chapters, Metadata) from left to right. If this is your first time, you should take a few minutes with the settings before you start converting any audio files. To get to the Options/settings window select "Tools" then "options" or click on the little gear-shaped "Options" icon.
2) Options and Settings
These images show some suggested settings followed by a short explanation. Once you understand what the settings do, feel free to experiment and set them to meet your needs.
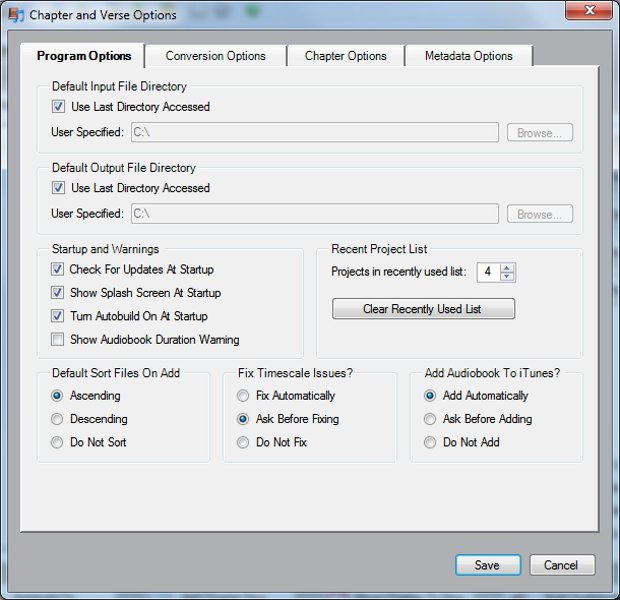
"Use Last Directory Accessed" is set to use the same directory this time that it used last time. You could specify a specific location if you want.
You can set the first three "Startup and Warnings" on or off.
Turn off the final one "Show Audiobook Duration Warning", unless you only want to make very small audiobooks. The warning will pop up frequently if you make medium or large audiobooks and can become annoying.
Default Sort files is set to "Ascending" so to get the files in named order: filechap1, filechap2, filechap3...
Fix Timescale Issues is set to "ask Before" to be able to look at the problem before the program fixes it; this rarely comes up as an issue.
Add Audiobook to iTunes is set to "add Automatically" because to create have a copy of each audiobook. This setting does not effect the audiobook, it just takes a few seconds to make a copy in your iTunes library.
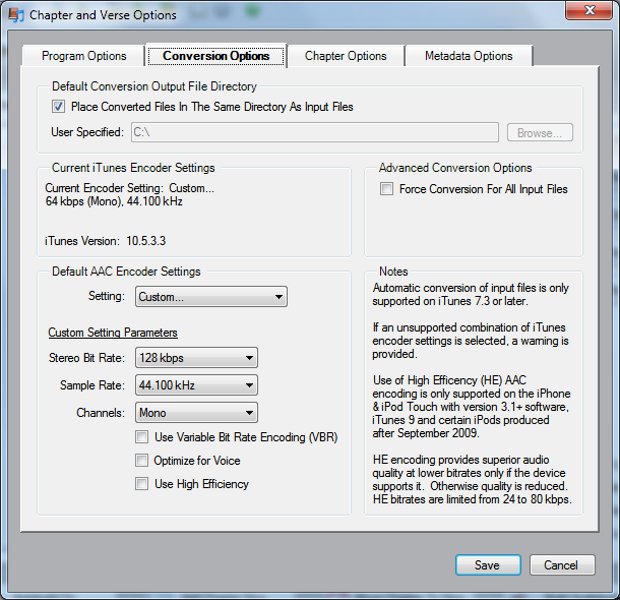
To keep things together, turn on "Place Converted Files.....". You can specify another location if you like.
The AAC encoder settings are both critical and confusing. The settings you see will make a 64kbps mono audiobook. Here is what first confused me, the 128kb setting - this is the Stereo rate - when you select Mono for channels you will only get half of that. Using a 64kbps Stereo bit rate and mono channels will give you a 32kbps audiobook.
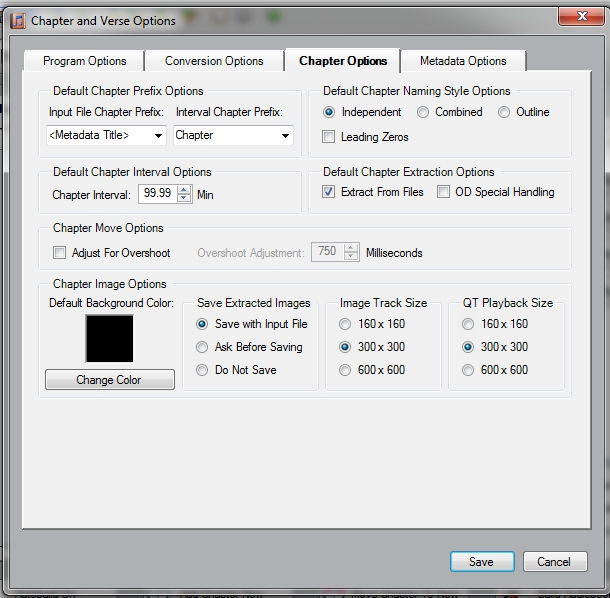
These settings control the information that automatically fills the "Chapters" tab in the main Chapter & Verse window. Use <Metadata Title" to pull the information for the chapter titles from the ID3 tags; the Interval is set to "Chapter" so if will pull the ID3 tag information with each new input file. The other settings for "Interval" and "Move" are set to very large values so that they should not activate.
Do not use chapter images so the settings are not important; if you use chapter images Chapter & Verse will create a movie or .M4A file instead of a .M4B file.
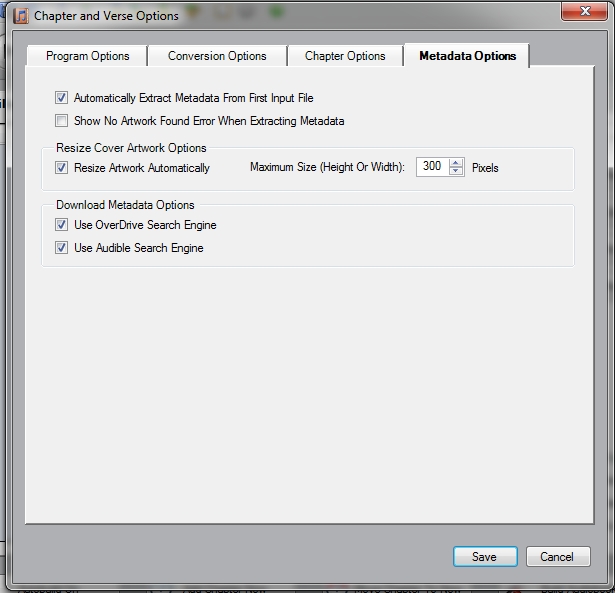
These settings control the information that automatically fills the "Metadata" tab in the main Chapter & Verse window.
"Automatically Extract ...from First Input File" is set so that the Artist, Album, etc. will fill in with the ID3 tags from the first chapter. If you turn off the "auto-fill" option, you will have to fill all of fields in the Metadata tab yourself. With it set to "auto-fill" you should just have to edit the title.
"resize Artwork Automatically" and "300" pixels are set in case the artwork was larger than 300x300 pixels in size.
3) Open Windows Explorer and navigate to the folder that contains the audio files you downloaded
Select the audio files in Windows Explorer and drag them to "Chapter & Verse", please re-read information about audiobook size above.
An "Audio Encoding Error Summary" window will pop up unless you have already converted the audio files to AAC. For .MP3 files this is an error screen you want to see. If you want to check or change your options/setting there is a button for that, otherwise select "Yes - Convert" to use the settings you have already selected.
"Chapter & Verse" will now startup iTunes to help converting the .MP3 files. There is a status bar at the bottom of the "Chapter & Verse" window and at the top of the iTunes window to track your progress. When the conversion is done, you should have information in all 3 main tabs (Input Files, Chapters, and Metadata).
The Input tab should show your files have been converted to .M4A files (.M4A is a type of .AAC file).
The Chapters tab should show the start time and title for each chapter. If you see a red-colored "!", the chapter names are duplicates. These are the names that will appear in the chapter list of the final audiobook, click on them and edit as needed.
The title of the first chapter automatically fills in the Title field; you will want to edit this as: a) the tile of the first chapter is rarely the same as the title of the book, and b) this will become the file name of the audiobook when it saves. Remove any punctuation and unnecessary words (A, An, The, of) in your file name.
Click "Select Artwork" and find the artwork you saved or created.
Check that the image of you art shows up in the upper-right and that your Title, Author, and Album are correct.
Then hit the "Build Audiobook" button and confirm/select your save directory.
When the audiobook build is done being you will have a M4B file ready to upload.
Audiobookbuilder for MAC users
You can buy a program called Audiobook Builder. You can download a free trial version, the full version costs about 5 US$. This program is very easy to use. A tutorial is available.
In order to choose the folder to which your files will be saved, go to preferences.
2.1. Create a New Project.
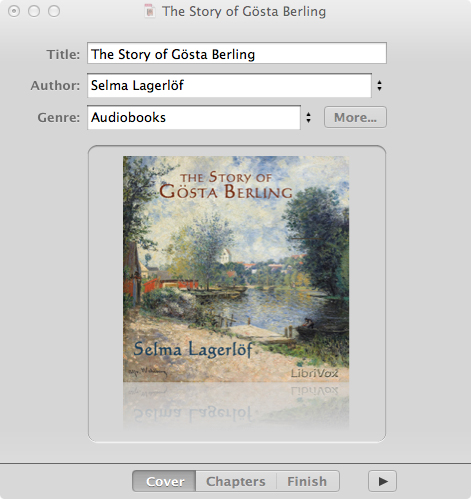
2.2. Fill in Author and Title fields.
2.3. Drag a cover image to the indicated field.
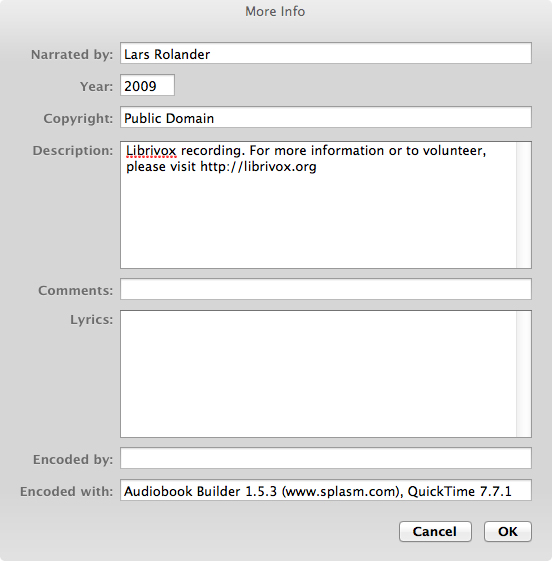
2.4. Click on the "more" button if you want to enter additional data ("narrated by", "Copyright", "Year", "Comments", etc...)
2.5. Click the "chapters" tab, drag the chapters to the Audiobook Builder. If the chapters have special characters, click on "Show details" to correct the title names (the special characters tend to look weird, but just copying them from the catalog page usually works).
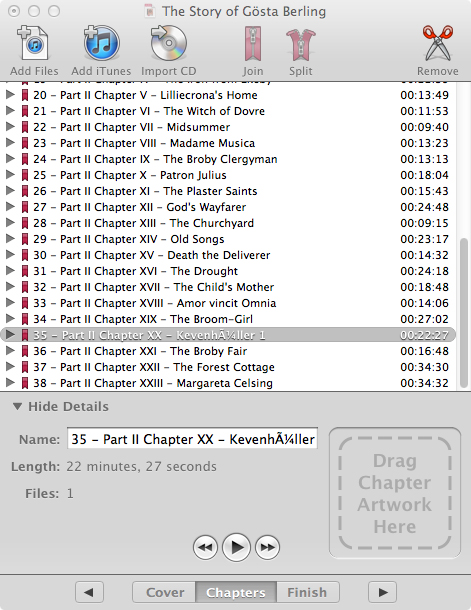
2.6. Once the chapters have been added (this can take some minutes), go to the "Finish" tab.
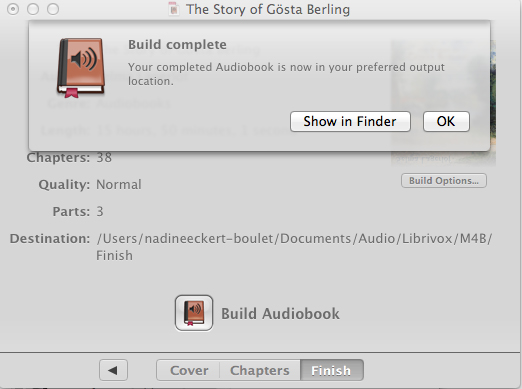
2.7. Check your settings in the "build options". Choose format: "M4B"; part style "Break Between Chapters". Set the target length to the desired duration so that you get a number of parts more or less equal in duration. Note: the total length for each file should not exceed 6 or 7 hours as some devices will have problems playing longer files.
2.9. Once your Audiobook is ready, a window pops up, saying: "Show in Finder" or "OK". Click "Show in Finder".
2.10. Rename your files (remove the numbers and articles at the beginning).
2.11. You're ready to upload!
