Noisecleaning With Pics
- For the full Noise Cleaning tutorial, please visit the Noise Cleaning page.
Pour des explications en francais, voir la page Comment éliminer le bruit de fond.
Para una explicación en español, ver la página Cómo eliminar el rumor de fondo.
Most of the time, a microphone will record background noise. Background noise can be anything from a slight buzz to an annoying high-pitched hiss. Cleaning up the background noise will highly improve the quality of your recordings.
How to Spot Background Noise
I always amplify before noisecleaning. I find it easier to spot noise. Background noise shows up as a fuzzy line. Things to keep in mind:
- Sometimes, when you're used to hearing the noise, it doesn't stand out that much to the ear.
- Depending on the frequency, the noise might even be practically inaudible! However, if your silences show up as a bold or fuzzy line, there is noise!
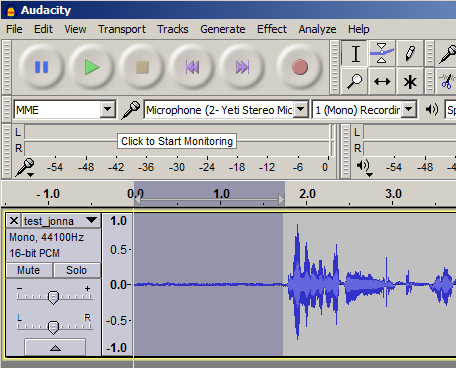
Here is what background noise looks like:

Clean up the Noise: Audacity versions from 2.1.0
1. Removing hum or whistle before using Noise Reduction
If you have a constant low-pitched hum, or high-pitched whistle, consider using Effect > Notch Filter to remove that frequency before using Effect > Noise Reduction. See this page in the Wiki for identifying the frequency of the hum or whistle and removing it.
2. Select a Noise Sample
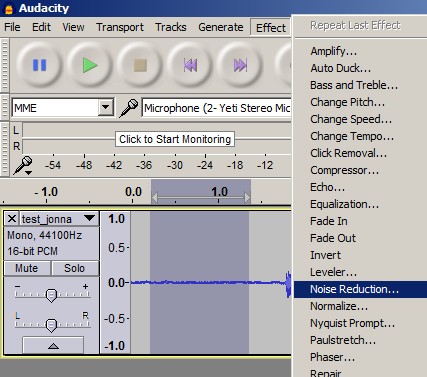
Highlight a section of your recording that has pure background noise. Be sure to not include any of your voice! Use a portion where the mic was on, but you were not speaking.

3. Define Your Selection as Noise
Tell Audacity this is the noise you want cleaned. Select Effect > Noise Reduction.

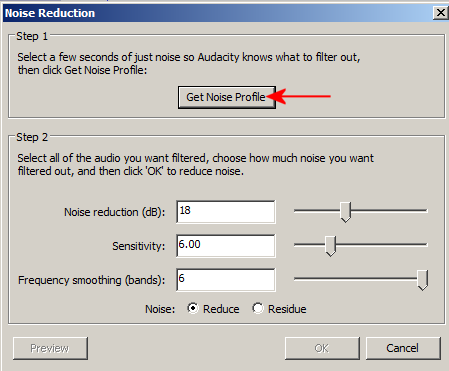
A dialog box pops up. Click on Get Noise Profile. The box will disappear.

4. Remove Noise
Select your entire track (Ctrl + A). Go back to Effect > Noise Reduction. Now, tweak the settings.
- Set Frequency Smoothing (bands) to 6. (This is the most likely setting you will use, but there is a chance that smoothing will make the desired audio less clear, so where your desired signal is strong and of wide frequency range and the noise is light, try leaving this control at 0 (off) or experiment with other values of 1 - 5.)
- Set Sensitivity to 6. If your noise is very light, you may find a lower setting for Sensitivity will be sufficient. Set this control to the lowest value that achieves effective noise removal without the introduction of tinkly artifacts.
- Now, play with the first slider. Start at the left, click Preview (bottom left), and keep increasing the number until you can't hear any background noise. Suggested values are 6 for light noise, 12 for medium noise, and 18 for heavy noise but try to avoid going above 20, as it might start distorting the sound. Once you find the right level, simply click OK.
- Wait for the program to run. It might take a couple of minutes if it's a long recording.
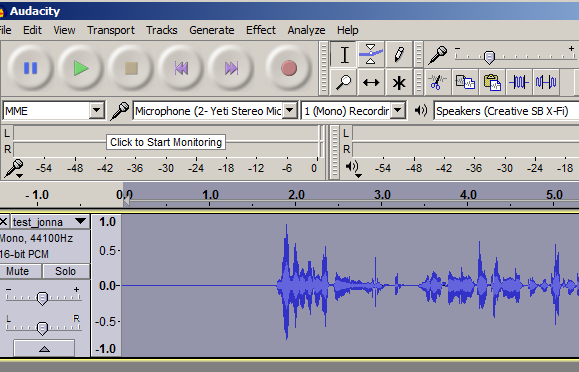
Here is the Result:

For full instructions on how to use the Noise Reduction feature in Audacity 2.1.0 and later versions, please see Noise Reduction in the Audacity Manual.